Page 20 - Lightroom Magazine Issue 25
P. 20
› › lightroom magazine › ›
working with dehaze adjustments
The Dehaze slider in the Effects panel can be used to com- pensate for atmospheric haze in photographs, as well as mist, fog, or anything that contributes to the softening of contrast and detail in a scene. For example, you can use the Dehaze slider to improve the contrast in photographs taken of a starry night sky by reducing the effects of light pollution. You can drag the slider to the right to apply a positive value and remove haze from a scene. If you drag the slider to the left, you can add haze to make an image look foggier. Basically, the results you get are in some ways similar to adjustments made using the Clarity slider, but a Dehaze effect is a lot stronger overall than can be achieved using the Clarity slider on its own.
There are a few things to watch out for though when work- ing with Dehaze; for example, it’s recommended you set the white balance first. Also, when you apply a Dehaze adjustment to remove haze, it can emphasize the lens vignetting in an image, so it’s best therefore to apply a lens profile correction (or a manual vignetting correction) first in order to remove the lens vignetting. Similarly, a positive Dehaze adjustment will emphasize sensor spots (which can easily be dealt with using the Spot Removal tool [Q]).
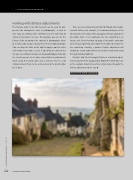
Overall, I find it best to apply Dehaze as a localized adjust- ment using either the Graduated or Radial Filter (Shift-M), such as the example shown here where I only needed to apply the Dehaze adjustment to the sky. ■
CLICK TO RATE
020 ALL IMAGES BY MARTIN EVENING
› › lightroom magazine › issue 25


