
Page 39 - Photoshop User March 2017
P. 39
› › DOWN & DIRTY TRICKS
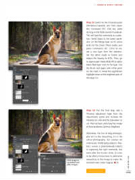
Step 13: Switch to the Channels panel (Window>Channels) and hold down the Command (PC: Ctrl) key while clicking on the RGB channel thumbnail. This will load the luminosity as a selec- tion. Switch back to the Layers panel, click on the Merge layer so it’s active (and not the Smart Filters mask), and press Command-J (PC: Ctrl-J) to cre- ate a new layer from the selection. Set the blend mode to Screen and reduce the Opacity to 64%. Then, go to Layer>Layer Mask>Hide All to add a black-filled layer mask to the layer. Use the Brush tool again with white paint on the mask to reveal the augmented highlight areas on the brightest parts of the dog’s fur.
Click image to see before and after images
Step 14: For the final step, add a Vibrance adjustment layer from the Adjustments panel and increase the Vibrance to +49 and the Saturation to +8. Then sit back and enjoy the image of this handsome German Shepherd.
Ultimately, the fun of dog photogra- phy isn’t in the retouching, it’s in the actual photography. But canines are notoriously challenging subjects. Kay- lee’s course is phenomenally helpful in capturing the right moments, but even after the shutter clicks, it’s nice to be able to know how to add some retouching to the image to make the moment even more magical. n
Discuss this Issue
[039]
> KELBY ONE.COM
