
Page 41 - Photoshop User March 2017
P. 41
› › BEGINNERS’ WORKSHOP
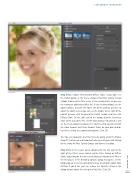
Step Four
Step Four: Choose Filter>Distort>Diffuse Glow. If you don’t see the Distort option in the menu, choose Filter>Filter Gallery instead (Adobe shortened the Filter menu a few versions back, so you may be viewing an abbreviated filter list). In the resulting dialog, use the zoom buttons, beneath the lower left of the portrait preview, to adjust the zoom level so you can see the model. To the right of the portrait preview, click to expand the Distort section, and then click Diffuse Glow. On the right side of the dialog, drag the Graininess slider all the way to the left, set the Glow Amount to around 3, and set the Clear Amount to around 14. You’ll need to experiment with the Glow Amount and Clear Amount sliders on your own photos, but these settings are a good starting point. Click OK.
Tip: You can repopulate the Filter menu by going under the Photo- shop (PC: Edit) menu and choosing Preferences>Plug-Ins and turning on the Show All Filter Gallery Groups and Names checkbox.
Step Five: In the Layers panel, double-click the tiny icon to the right of the filter’s name (which will be Filter Gallery or Diffuse Glow, depending on the menu item you picked to open the filter in the first place). In the Blending Options dialog that opens, set the Mode pop-up menu to Luminosity to keep the photo’s colors from shifting. If you’d like, you can reduce the Opacity setting in this dialog to tone down the strength of the filter. Click OK.
Step Five
[041]
> KELBY ONE.COM
