
Page 37 - Photoshop User March 2017
P. 37
› › DOWN & DIRTY TRICKS
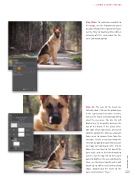
Step Nine: To add some warmth to the image, use the Adjustments panel to add a Photo Filter adjustment layer. Set the Filter to Warming Filter (85) at a Density of 25%, and enable the Pre- serve Luminosity option
Step 10: The eyes of the beast are naturally dark. Click on the photo layer in the Layers panel to make it active, and use the Quick Selection tool (W) to select the eye areas. Tip: Use the Left Bracket key ([) to quickly decrease the size of the brush. If the Quick Selec- tion tool selects too much, press-and- hold the Option (PC: Alt) key, and paint those areas to remove them from the selection. Create a new layer from the selection by going to Layer>New>Layer Via Copy (or Command-J [PC: Ctrl-J]). Move this new layer to the top of the layer stack, and set the blend mode to Screen near the top left of the Layers panel to brighten the eyes significantly. Then, use the Eraser tool (E) with a soft round tip to soften any hard or sharp edges. Double-click the name of the layer, and rename it “Eyes.”
[037]
> KELBY ONE.COM
