
Page 36 - Photoshop User March 2017
P. 36
››HOWTO
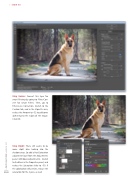
Step Seven: Convert this layer for smart filtering by going to Filter>Con- vert for Smart Filters. Then, go to Filter>Lens Correction. Switch to the Custom tab, and in the Vignette area, reduce the Amount to –52 to add some darkening to the edges of the image. Click OK.
Step Eight: There still seems to be some slight blue leaking into the shadow areas. So add a Hue/Saturation adjustment layer from the Adjustments panel (Window>Adjustments). Switch to the Blues in the Properties panel, and reduce the Saturation slider to –50. If the colorization still persists, reduce the
[036] saturation for the Cyans, as well.
> PHOTOSHOP USER > MARCH 2017
