
Page 38 - Photoshop User March 2017
P. 38
››HOWTO
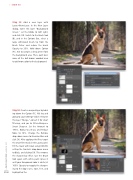
Step 11: Add a new layer with Layer>New>Layer. In the New Layer dialog, name this layer “Background Green,” set the Mode to Soft Light, and click OK. Switch to the Brush tool (B), and in the Options Bar, select a large soft-round brush tip from the Brush Picker and reduce the brush Opacity to 20%. Hold down Option (PC: Alt) to sample a deep green from the background area. Then, paint over some of the dull brown wooded area to add more color to the background.
Step 12: Create a merged layer by hold- ing down the Option (PC: Alt) key and going to Layer>Merge Visible. Rename this layer “Merge,” convert it for smart filtering, and go to Filter>Sharpen> Smart Sharpen. Set the Amount to 193%, Radius to 2.8 px, and Reduce Noise to 14%. Change the Remove drop-down menu to Gaussian Blur and click OK. After applying the filter, target the smart filter mask in the Layers panel. Fill the mask with black using Edit>Fill, setting the Contents drop-down menu to Black, and clicking OK. This removes the sharpening effect. Use the Brush tool again with white paint (press X until your Foreground color is white) at 100% Opacity to reapply the sharpen- ing to the dog’s eyes, nose, feet, and
[038] highlighted fur.
> PHOTOSHOP USER > MARCH 2017
