
Page 28 - Photoshop User March 2017
P. 28
››HOWTO
Step 14
Step 15
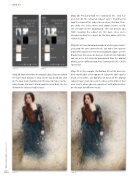
Step 14: Now remember the original subject layer we added the layer mask to back in Step Seven? Go ahead and click on the layer mask thumbnail on this layer to make it active. Also, change this layer’s blend mode to Linear Burn, like we did with the extracted subject layer.
Step 15: Press-and-hold the Command (PC: Ctrl) key and click on the extracted subject layer’s thumbnail to load the shape of the subject as an active selection. Then, go under the Select menu and choose Inverse to flip the selection to the background. This will prevent you from revealing the subject on this layer, since we’re already blending the subject on the layer above with the texture below.
Step 16: Set your Foreground color to white by pressing D, and using the same spatter brush, just dab a few spatters around the subject to reveal the background. Again, use the Bracket keys to increase or decrease the brush size. Now you can see we’re still using the background from the original photo, just in a different way. Press Command-D (PC: Ctrl-D) to Deselect.
Step 17: In this example, the bottom left of the dress has been masked out a little too much. Using the same spatter brush set to white, just dab once or twice on the original subject’s layer mask to reveal the dress a little more in that area. Here’s where you can experiment with other brushes on the mask for different results.
Step 16
Step 17
[028]
> PHOTOSHOP USER > MARCH 2017
