
Page 29 - Photoshop User March 2017
P. 29
› › DOWN & DIRTY TRICKS
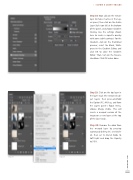
Step 18: Now click on the texture layer to make it active in the Lay- ers panel, then click on the Add a Layer Style icon (fx) at the bottom of the panel, and choose Gradient Overlay. Use the settings shown here to create a vignette overlay with some subtle contrast. For the Gradient, click on the thumbnail preview; select the Black, White preset in the Gradient Editor; and click OK to close the Gradient Editor. Than, turn on the Reverse checkbox. Click OK when done.
Step 19
Step 20
Step 19: Click on the top layer in the layer stack (the extracted sub- ject layer), then press-and-hold the Option (PC: Alt) key, and from the Layers panel’s flyout menu, choose Merge Visible. This will create a merged version of the image on a new layer at the top of the layer stack.
Step 20: Remove the color from this merged layer by pressing Command-Shift-U (PC: Ctrl-Shift- U), then set its blend mode to Soft Light and drop the Opacity to 50%.
[029]
> KELBY ONE.COM
