
Page 25 - Photoshop User March 2017
P. 25
› › DOWN & DIRTY TRICKS
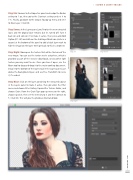
Step Six: Go over to the Properties panel and nudge the Radius setting to 1 px, then go to the Contrast setting and set it to 7%. Finally, go down to the Output To pop-up menu and set it to New Layer. Click OK.
Step Seven: In the Layers panel, you’ll notice the new extracted layer, and the original layer remains but it’s turned off. Turn it back on and click on it to make it active, then press-and-hold Option (PC: Alt) and click on the Add Layer Mask icon (circle in a square) at the bottom of the panel to add a black layer mask to hide the image on the layer. We’ll get back to this in a moment.
Step Eight: Now open the texture that will be the base of the new image. You can use the texture we’re using here, which is provided as part of the exercise downloads, or any other light texture you may want to use. Once you have it open, use the Move tool to drag-and-drop it to the main working document. Drag it to the bottom of the layer stack in the Layers panel, just above the Background layer, and use Free Transform to resize it, if needed.
Step Nine: Click on the layer containing the extracted subject in the Layers panel to make it active, then go under the Filter menu and choose Filter Gallery. Expand the Texture folder, and choose Grain. From the Grain Type pop-up menu on the right, choose Speckle, then set the Intensity to 3 and the Contrast to 5. Click OK. This will give the photo an illustrated look.
Step Six
Step Seven
Step Eight
[025]
> KELBY ONE.COM
©PhotoArtTextures.com
