
Page 89 - Photoshop User January 2017
P. 89
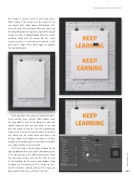
the image is saved, select it, and click Open. Don’t worry if the image isn’t the exact fit; we can adjust that. Hold down Shift-Option (PC: Shift-Alt) and click-and-drag from any corner of the bounding box that appears around the placed image to resize it proportionally from the center outward. Drag until the image fills the entire canvas so when it’s printed and trimmed, it will print to the edge. Press Enter again to confirm the transformation.
We’ll add some text using my mantra for 2017: Keep learning, keep earning. Most people select the Type tool (T), click in the document, and start typing; however, you can also draw a text box over the image so that the text will automatically wrap to the next line or remain within the bound- ary, which can be useful when you have a lot of type. Again, we’ll explore this more in a future tutorial. In the Options Bar, we selected the text font, size, color, and the Center Text icon.
We’ll just add a cheeky drop shadow to the type by going to the Layers panel (Window>Layers if it’s not already in the right-hand panels). With the type layer active, click on the little ƒx icon at the bottom of the panel and choose Drop Shadow. Set the Opacity to 77%, Angle to 120°, and the Distance, Spread, and Size to 3 (you can play around with these settings). Click OK.
089
› › DESIGNING IN PHOTOSHOP
› › kelbyone.com
