
Page 88 - Photoshop User January 2017
P. 88
HOW TO ››
Document dialog, select A4, and click Create. For print, I always design at 300 ppi (pixels per inch). You can get away with a lower resolution but you can’t go wrong with 300 ppi; it’s an industry standard. The beauty of using Adobe Stock or images from your camera, which is hope- fully set to the highest resolution or even RAW, is that they’re suitable to go straight to print at 300 ppi. The Print presets in the New Document dialog automatically set the Resolution to 300 ppi for you.
It’s advisable to start every project like this; in some cases you can open existing artwork and add the bleed afterwards. Make sure that the rulers are displayed by choosing View>Rulers or pressing Command-R (PC: Ctrl-R), and to assist with precision, ensure that snapping is enabled by choosing View>Snap. Now click once in the top ruler and drag a guide to the top edge of the document, where it should automati- cally snap to the edge of the document. Do this for all sides of the document until you have four guides showing. These
guides are there to show you where your bleed will start.
LET IT BLEED
Now we need to increase the document size by the amount of the bleed. We know that A4 is 210x297mm. If we’re add- ing 3mm bleed all the way around, then we need to add a total of 6mm to both dimensions, giving us 216x303mm. (If you need more bleed, just use the same equation.)
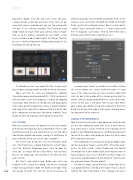
The easiest way to do this is to select Image>Canvas Size. You’ll now have a dialog showing the current docu- ment size. Bizarrely, Photoshop never seems to show the exact size; it’s always off just a tad. Why? I have no idea! But we can simply type 216 and 303 in the New Size area and click OK.
But there’s also another way. Before you enter any numbers in the Canvas Size dialog, turn on the checkbox below that says Relative (both the Width and Height fields
088 will change to zero). This tells the canvas to increase by
whatever you type into the Width and Height Fields. In this instance, we’ll enter 6mm into both the Width and Height fields. I prefer this method because I don’t need to do the “maths” (yep, I said maths with an “s”—that’s how we roll here in England); I just know I need to enter 6mm (for a 3mm bleed) or 10mm (for a 5mm bleed, etc.).
A couple more things to consider here before clicking OK are to choose the Canvas Color Extension—in most cases, it’ll be white, but you can select any other color. And click the dot in the middle of the Anchor grid so that the canvas extends equally outward from the center of the doc- ument (in this case, it will add 3 mm to each side). When you’re done, you should end up with a document that’s the bleed size of your final project with guides showing where the document will be trimmed.
ADDING THE INGREDIENTS
Now that we have our print-ready document sized correctly, we can start adding the pretty stuff. Keep in mind that the final printed piece will be trimmed at the location of the guides in your Photoshop document. Anything that you want to print to the edge needs to go past those lines to the edge of the document onscreen.
We’re going to use an image we found on Adobe Stock to make our poster image. I searched for “white brick wall,” and in the Filter section I chose Photos only and Portrait Orientation (we’ll cover Adobe Stock and templates more in future projects). Once we’ve found the perfect image, we can license and download it to our computer. By all means, use your own images for your projects.
To add the image, go to File>Place Embedded (there is an option for Place Linked but we’ll cover that in a future tutorial; for now, Embedded is fine). Navigate to where
› › photoshop user › january 2017
