
Page 60 - Photoshop User January 2017
P. 60
HOW TO ››
Step One
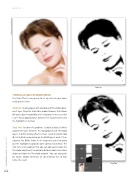
THRESHOLD AND THE MIXER BRUSH
The final effect is easy-peasy to set up, but can give some really great results.
Step One: Starting again with a photo and Threshold adjust- ment layer. Drag the slider for a modest balance that shows off your subject reasonably well. It happens in this case that I can’t find a good balance between her facial features and the highlights in her hair.
Step Two: To solve the problem, I added a Black & White adjustment layer between the Background and Threshold layers. In order to only affect her hair, I used the Brush tool (B) set to black and painted on the B&W layer’s mask. I then adjusted the B&W sliders in the Properties panel to bring out the highlights to provide some contrast and detail. The trick here is to recognize that you can add layers below the Threshold adjustment to control individual colors and values above or below the Threshold amount. You can also paint on masks, dodge and burn, or do anything else to help refine the result.
Step Two
060
› › photoshop user › january 2017
©Adobe Stock/Svetlana Fedoseeva
