
Page 42 - Photoshop User January 2017
P. 42
HOW TO ››
Step 19
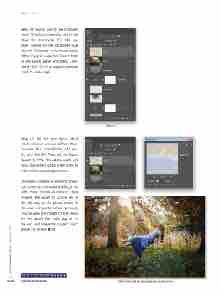
Step 19: Switch over to the Channels panel (Window>Channels), and hold down the Command (PC: Ctrl) key while clicking on the composite RGB channel. This loads the luminous values of the image as a selection. Switch back to the Layers panel and press Com- mand-J (PC: Ctrl-J) to copy the selected pixels to a new layer.
Step 20: Set the new layer’s blend mode to Screen and go to Filter>Blur> Gaussian Blur. Use a Radius of 5 pix- els, and click OK. Then, set the layer’s Opacity to 25%. This adds a subtle soft focus glow effect to the entire scene to finish off the surreal appearance.
Ultimately, creating a stunning levita- tion scene isn’t particularly difficult. As with many “photo-illustration” type projects, the secret to success lies in the planning of the photo shoot. In this case, using a tripod and knowing how to pose the model on the chairs are the details that really pay off in the end and make this project “rise” above the others! ■
CLICK TO RATE
042 ALL IMAGES BY KIRK NELSON
Click-and-hold on the image for a before view
› › photoshop user › january 2017
