
Page 89 - Photoshop User February 2017
P. 89
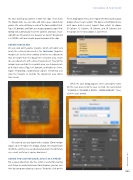
the sides to bring our content in from the edge. If we check the Margin box, we can now add some space around our guides. We entered 20mm in each of the four available fields: Top, Left, Bottom, and Right (see images opposite page). Pho- toshop will automatically resize the columns and rows, ensur- ing both are still equal in size, because we haven’t designated a set Width, with our margin appearing around the edge.
ADDING FAKE BLEED
We can also add negative margins, which will work very much like a bleed (discussed in the last issue). Negative margins are useful when adding elements to a document that are larger than the document’s viewable area, much like any document with a bleed requirement. To add this margin space outside the viewable area, we changed each of the four values (Top, Left, Bottom, and Right) to –5mm. Again, Photoshop automatically adjusts everything, but now the margins sit outside the document area rather than inside.
We want to save our layout with a regular 20mm-margin layout, so we’ll reopen the dialog, change the margins back to 20mm, and then we can go ahead and save this for future use—most useful on a square document.
SAVING THE CUSTOM GUIDE LAYOUT AS A PRESET
For a square document like this, which is useful for creating such things as marketing images for Instagram, you can save time by saving your layout as a preset. To do this, click on the
Preset drop-down menu at the top of the New Guide Layout dialog, where it says Custom. This opens a small flyout menu with some built-in preset layouts from which to choose (8 Column, 12 Column, 16 Column, and 24 Column); but the option we need to choose is Save Preset.
When the Save dialog appears, enter a descriptive name for this new preset into the Save As field. We named ours “SQUARE-3 COLUMNS-3 ROWS - 20MM MARGIN.” Then, click the Save button.
› › DESIGNING IN PHOTOSHOP
089
› › kelbyone.com
