
Page 87 - Photoshop User February 2017
P. 87
are added with the default settings. We’ll easily add rows later in this tutorial.
Note: If you already had guides in your document, you can clear these existing guides in the New Guide Layout dialog by selecting the Clear Existing Guides option at the bottom.
CHANGE THE NUMBER OF COLUMNS
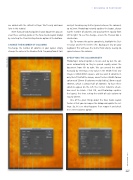
To change the number of columns in your layout, simply change the value in the Number field. I’m going from 8 to 6
and just tweaking my Gutter (space between the columns) up to 2mm. Photoshop instantly updates the layout, chang- ing the number of columns and spacing them equally from left to right. To see this change, ensure the Preview box is checked on.
Tip: To remove the gutter completely, highlight the Gut- ter value and hit the Delete (PC: Backspace) key on your keyboard. This will leave the Gutter field empty, leaving no space between the columns.
SPECIFYING THE COLUMN WIDTH
Photoshop’s default option is to size and lay out the col- umns automatically so they’re spaced equally across the document from left to right. We can amend the width manually by entering a new value in the Width field. Our image is 340x340mm square, and we want 6 columns in only the left half of the image, so we’ll enter a Width for our columns of 28mm (6 columns multiplied by 28mm equals 168mm, which is almost half of 340mm). To have these columns appear on the left, the Center Columns check- box must be blank. Click OK, and Photoshop updates the layout, this time setting the width of each column to exactly 28mm.
One of the great things about the New Guide Layout feature is that you can reopen the dialog and update the set- tings. So, let’s see what happens if we reopen it and check the Center Columns option.
› › DESIGNING IN PHOTOSHOP
087
› › kelbyone.com
©Adobe Stock/Arlenta
