
Page 66 - Photoshop User February 2017
P. 66
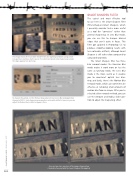
The image shown here was taken hand-held in low-lighting conditions using a wide lens aperture and slow shutter speed. It needed substantial extra sharpening to make the edges appear nice and crisp.
SMART SHARPEN FILTER
The easiest and most effective tool to use here is the Smart Sharpen filter (Filter>Sharpen>Smart Sharpen), which I generally consider to be more useful as a tool for “corrective” rather than general sharpening. In Lens Blur mode, you can use this to sharpen blurred edges that aren’t quite in focus. This filter got updated in Photoshop CC to produce smoother-looking results with less noticeable artifacts, although Smart Sharpen is still rather slow compared to using Unsharp Mask.
The Smart Sharpen filter has three blur removal modes: the Gaussian Blur mode makes it work more or less the same as Unsharp Mask; the Lens Blur mode is the more useful as it enables you to counteract optical lens blur- ring; and lastly, there’s the Motion Blur removal mode, which can sometimes be effective at removing small amounts of motion blur from an image. After you’ve selected a blur removal method, you can use the Amount and Radius slider con- trols to adjust the sharpening effect.
To sharpen this photo, I set the Remove drop-down menu to Lens Blur and applied an Amount of 400%. Such sharpening can produce noticeable artifacts; however, you can adjust the Reduce Noise slider to suppress these.
Here are two close-up views of the image showing how it looked before and with the Smart Sharpen filter applied.
066
› › photoshop user › february 2017
