
Page 64 - Photoshop User February 2017
P. 64
With landscape subjects, you generally find such photos contain lots of fine detail. To sharpen these, you’ll want to apply a lower Radius together with an increased Amount setting and increased Detail. This combination concentrates the sharpening effect on the fine edges and texture detail.
with a small lens aperture. If you need the extra depth of field but are concerned about losing optimum lens performance, adding more Detail can help correct for this.
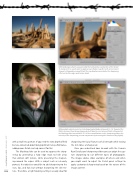
The Masking slider can be used to suppress the sharp- ening by generating a halo edge mask to hide areas that contain soft texture, while preserving the sharpen- ing around the edges. With a subject such as a beauty portrait, the objective would be to add sharpening to the eyes, lips, and hair, but without sharpening the skin tex-
sharpening the facial features at full strength while leaving the skin tones unsharpened.
Once you understand how to work with the Camera Raw Detail panel sharpening sliders you can adapt the cap- ture sharpening to suit different types of photographs. The images above show examples of where and when you might want to adjust the Detail panel settings to apply customized sharpening based on the nature of the image content.
With portrait subjects, you’re best selecting a higher Radius of around 1.2–1.4. To protect the flatter skin tones from being sharpened, you’ll want to select a lower Detail setting and set the Masking slider to around 60–70. As these modifications to the sharpening reduce the intensity of the sharpening, you can compensate by increasing the Amount setting slightly.
064 ture. Therefore, a high Masking setting is usually ideal for
› › photoshop user › february 2017
