
Page 18 - Lightroom Magazine Issue 28
P. 18
› › lightroom magazine › ›
step two: use the graduated filter to close up your photo
Before I start with the Graduated Filter, I’m going to do my usual workflow to have a nice start. In the Basic panel, I set the Highlights to –48, the Shadows to +60, the Whites to +44, and the Blacks to –28.
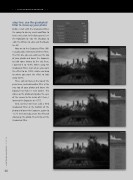
Now on to the Graduated Filter (M)! I usually add a minimum of three filters. The first one you can add near the top of your photo and lower the Exposure to add some drama to the sky (here, I lowered it to –0.97). When using the Graduated Filter, start where you want the effect to be 100% visible and drag to where you want the effect to fade away to 0%.
Then, click on New at the top of the panel area, and add another filter at the very top of your photo and lower the Exposure to make it even darker. This closes up the photo and guides the eyes of the viewer to the inside of it (here, I lowered the Exposure to –0.77).
And, last but not least, add a third Graduated Filter at the bottom of the photo and lower the Exposure, again (to –0.77, here) to really create this effect of closing up the photo. Press M to exit the Graduated Filter.
018
› › lightroom magazine › issue 28
