
Page 17 - Lightroom Magazine Issue 28
P. 17
› › lightroom magazine › ›
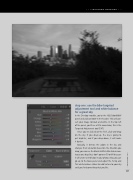
step one: use the b&w targeted adjustment tool and white balance for a great sky
In the Develop module, go to the HSL/Color/B&W panel and click on B&W in the header. This will con- vert your image to black and white. In the top left of the panel, you’ll see a little round icon; this is the Targeted Adjustment tool (TAT).
Once you’ve clicked on the TAT, click-and-drag on the sky. If you drag up, the sky is going to get brighter, and if you drag down, it will make it darker.
Basically, it detects the colors in the sky and changes their saturation based on the direction you drag; you can see the Black & White Mix sliders mov- ing as you drag. But, don’t go over 50 or 60 because it will create weird halos in your photo. Also, you can go up to the Basic panel and adjust the Temp and Tint white balance sliders to add texture to your sky until you find something that you like.
017
› › kelbyone.com
