
Page 20 - Lightroom Magazine Issue 28
P. 20
› › lightroom magazine › ›
step five: use brushes to re-light your photo
This is the fun part—you get to take a brush and paint some light over your photo. Get the Adjustment Brush (K), and at the bottom of the panel, set your Flow and Density to around 70 or 80, the Feather to 100, and then boost the Exposure (here, I increased it to 1.16).
Now just paint over the part of your photo that you want to enhance, like the bench in this photo. The idea is not to go crazy with this, and not to make it look too obvious. So, make sure to not have big spots of light because it then defeats the purpose. I also brightened the bushes to the left and right of the bench a little.
It might seem like a lot of retouching, but when you study the old masters of photography, they used the same techniques on their film—they would add +3 of exposure, 4% of dark, and so on to create this dodge-and-burn effect! But it’s way easier to do it today in Lightroom! n
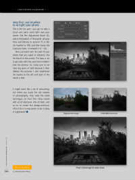
Original color image
Initial B&W conversion
Discuss this Issue
Final: Click image for slide show
020 ALL IMAGES BY SERGE RAMELLI
› › lightroom magazine › issue 28
