
Page 12 - Lightroom Magazine Issue 28
P. 12
› › lightroom magazine › ›
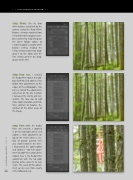
step three: The As Shot white balance calculated by the camera (using the Auto White Balance setting) matched how I remembered the original scene. But I wanted to really bring out the green foliage colors, so I chose to apply a custom white balance setting, making the Temp setting warmer (by drag- ging it to the right) and the Tint setting greener (by drag- ging it to the left).
step four: Next, I selected the Radial Filter tool in the tool- box (Shift-M) and added a few Radial Filter adjustments to the edges of the photograph. You can see two of the adjustments active here on the left, in which I increased the Clarity and Sat- uration. The idea was to add more color saturation and mid- tone contrast to balance the contrast of the other areas of the image.
step five: With the Radial Filter still selected, I zoomed in on the top-right corner and added a small adjustment on top of the trestle where a sec- tion of orange painted steel was visible between the trees. I desaturated the color slightly and added a –100 Tint adjust- ment to color this section green (shown here is the Radial Filter adjustment with the red color overlay active; press O to turn it on). The result of this adjust- ment can be seen more clearly
012 in the following step.
› › lightroom magazine › issue 28
