
Page 14 - Lightroom Magazine Issue 28
P. 14
› › lightroom magazine › ›
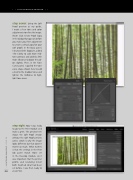
step seven: Using the Soft Proof preview as my guide, I made a few tone and color adjustments to refine the image. (Note: Click Create Proof Copy in the dialog that appears before you make your first adjustment to create a virtual copy for your soft proof.) In the Basic panel, I decreased the Exposure, added +50 Clarity to add more mid- tone contrast, and added a little more Vibrance to boost the col- ors slightly. Then, in the Tone Curve panel, I applied the tone curve shape shown here to add a kick to the shadow tones and lighten the midtones to high- light tone areas.
step eight: Now I was ready to go to the Print module and make a print. The preview here shows the Soft Proof version without the Soft Proof preview active, which is why the image looks different; but that doesn’t matter so much. What matters is that the settings in the Print Job panel match those set in the Develop module, so it was important that the printer profile and rendering Intent both matched what had been set before. I was then ready to
014 click Print.
› › lightroom magazine › issue 28
