
Page 37 - Lightroom Magazine Issue 26
P. 37
› › lightroom magazine › ›
demo, I’ve selected Heart, Hollow in the Creative Aperture category to really show the effect here. For the final image, I’ve gone with Sunburst, which is subtler.
overlays panel
We took a detailed look at the Over- lays panel in the previous article, so here I’m only showing you (top left) what I’ve added to this image for effect. I’ve cho- sen Vintage 4 for Border, Side 3 for Light Effect, and Paper 3 for Texture. For Light Effect, I increased the Zoom to 1.43 and lowered the Opacity to 60.
spot heal tool
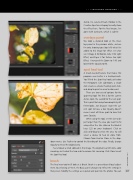
A much-needed feature that makes this program even better is a healing brush. You’ll find the Spot Heal tool just below the Histogram. Like Lightroom, a single click creates a circular healing spot; click- and-drag to paint an area to clone out.
There are two sets of options for the Spot Heal tool: The first is for the current Active Spot, the second for the next spot. This is great for having two completely dif- ferent looks. Just because I want the cur- rent spot to have a low Opacity doesn’t mean I want all future spots to have that same Opacity.
When using the tool, set the size to be just larger than the area you want to fix using either the Size slider or the Bracket keys ([,]) on your keyboard. Click or click-and-drag to select the area. X2 will select a source to heal or clone from. Choose from Heal or Clone in the drop-
down menu. Use Feather to control the blending of the edge. Finally, change Opacity to reveal the original area.
I’ve removed a small cobweb in this image. The original heal left some color smearing, so I healed the two ends to remove this smearing. Click Close to exit the Spot Heal tool.
brush
The final new tool we’ll look at is Brush. Brush is a preset-based local adjust-
ment. By selecting a Preset, the Basic panel changes to reflect the settings in
that preset. Modify the settings as required and paint on the photo. You can 037
› › kelbyone.com
