
Page 19 - Lightroom Magazine Issue 26
P. 19
› › lightroom magazine › ›
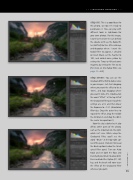
step six: This is a good base for this photo, so now I’m ready to personalize it. You can play with different tools in Lightroom for your own photos. For this image, I want to re-create the sun behind the clouds, so I’ll use the Radial Fil- ter (Shift-M) for this. After clicking- and-dragging where I want the Radial Filter to appear, I checked on Invert Mask, set the Feather to 100, and added some yellow by setting the Temp to 49 and some magenta by setting the Tint to 34. [For more on the Radial Filter, see page 10.—Ed.]
step seven: You can use the Graduated Filter (M) to darken skies in your images. Just start dragging where you want the effect to be at 100%, and stop dragging where you want it to be 0%. Double-click the word “Effect” at the top left of the Graduated Filter panel so all the settings are at 0, and then lower the Exposure to –1.21. (Graduated Filter tips: Drag the outer lines to expand the effect, drag the middle line to rotate it, and drag the dot in the center to reposition it.)
Now the sky is darker but it also affects other parts of the photo, such as the mountain on the right, which isn’t nice. While using the Graduated Filter, you’ll see the word “Brush” at the top-right cor- ner of the panel. Click on it to reveal the Brush options below the Grad- uated Filter panel. Turn on Auto Mask and set both the Flow and Density of your brush to around 80. Press-and-hold the Option (PC: Alt) key, and the brush will now erase the effect of the Graduated Filter wherever you paint.
019
› › kelbyone.com
