
Page 55 - Photoshop User March 2017
P. 55
DIFFUSION SLIDER COLOR TEST
Now let’s take a look at the example below, which is our first visual experiment. Here, you’ll find two segments in this image: each section has five rainbowcolored lines stacked on top of one another, and then at the bottom, each section has one set of colored dots. This experiment is using the Healing Brush tool. On the left, I used a Diffusion slider value of 1, and on the right, a Diffusion slider value of 7. Which side do you think does a better job of trying to blend the surrounding grey color in with the colors? I think it’s the left side.
Healing Brush Tool
Take a moment to pay particular atten tion to the colored dots on the right side (the Diffusion 7 side). When I tried to blend them into one another using the Healing Brush tool, it gave me exceptionally strange results. If you look closely, you can see a diagonal, accordion shapedlike line I drew between the colors. How in the world did Photoshop think to add blue in between me trying to heal between red and yellow? And again, and even more apparent, when I healed in between yellow and green, the tool decided to throw some purple in there! If you look at the same dots on the left side (Diffusion 1), you can see that there have been no contaminating colors added into the healed sections by the tool. (Look for red arrows; there aren’t any.)
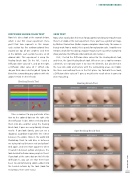
SKIN TEST
Now, what exactly does this mean for you portrait and beauty retouchers out there? Let’s look at this next experiment. Here, you’ll see a grid of an image by Michael Corsentino. (Before anyone complains about why I’d remove a beauty mark from a model, this is purely for explanation sake. I would never remove a mark like this during a regular retouch, but it’s a perfect example to show you how the Diffusion slider works on skin texture.)
First, I tested the Diffusion slider values for the Healing Brush tool, and then, the Spot Healing Brush tool. When we use a tool to remove a blemish, we not only want it to erase the blemish, but also blend in the new skin color and texture with the surrounding areas, so it looks like there was nothing there in the first place. So, for both these tools, a Diffusion slider value of 1 gives a much better result when it comes to skin retouching.
Healing Brush Tool
Spot Healing Brush Tool
› › RETOUCHING MAGIC
DIFFUSION 1 DIFFUSION 7
ORIGINAL DIFFUSION 1 DIFFUSION 2 DIFFUSION 3
DIFFUSION 4 DIFFUSION 5 DIFFUSION 6 DIFFUSION 7
ORIGINAL DIFFUSION 1 DIFFUSION 2 DIFFUSION 3
DIFFUSION 4 DIFFUSION 5 DIFFUSION 6 DIFFUSION 7
[055]
> KELBY ONE.COM
