
Page 56 - Photoshop User March 2017
P. 56
››HOWTO
SKY TEST
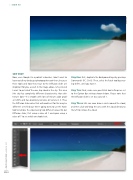
Now, even though I’m a portrait retoucher, I don’t want to leave out all my landscape photographers out there, because these tools and how they react to the Diffusion slider are important for you, as well. In the image above, let’s pretend I want to get rid of the one, big cloud in the sky. This area (the sky) has completely different characteristics than skin texture does—it’s smooth with lots of minute color gradi ent shifts and has absolutely no noise or texture in it. Thus, the Diffusion slider value that will work best for this may be different! Let’s find out. We’re going to try to use the Patch tool to remove the cloud using two different values for our Diffusion slider, first using a value of 1 and again using a value of 7 to see which one looks best.
Step One: First, duplicate the Background layer by pressing CommandJ (PC: CtrlJ). Then, select the Patch tool by press ing ShiftJ, until you have it.
Step Two: Next, make sure your Patch tool settings are set to the Option Bar settings shown below. Please note that the Diffusion slider is set to a value of 1.
Step Three: We can now draw a circle around the cloud, and then clickanddrag the area with the cloud directly to the left to remove the cloud.
[056]
> PHOTOSHOP USER > MARCH 2017
Kristina Sherk
