
Page 50 - Photoshop User March 2017
P. 50
››HOWTO
Step Three: Create a Hue/Saturation adjust- ment layer (Layer>New Adjustment Layer>Hue/ Saturation) directly above the Curves adjustment layer. Set its blend mode to Saturation by press- ing Option-Shift-T (PC: Alt-Shift-T), or by using the blend mode pop-up menu. Press Command- Option-G (PC: Ctrl-Alt-G) to clip the Hue/Satura- tion adjustment layer to the foreground element so that it only affects the model. Then, set the Saturation to –25.
Step Four: Disable the Saturation Map layer by clicking on its Eye icon, and you’ll see that the model is looking more like she’s part of the background and not a separate element.
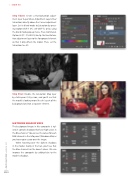
MATCHING SHADOW HUES
The background image in this composite is styl- ized; it contains shadows that have high values in the Blue channel. You can see the values for each RGB channel in the Info panel (Window>Info) as you hover your cursor over the image.
When hovering over the darkest shadows in the model, mainly in the hair, you’ll see that the Blue channel has the lowest values. We can improve the composite by adding blue to the model’s shadows.
[050]
> PHOTOSHOP USER > MARCH 2017
