
Page 93 - Photoshop User January 2017
P. 93
install in the Finder [PC: Explorer]). Right-click on it and choose Get Info. You’ll see a window with info, includ- ing a checkbox that says, “Open in Low Resolution.” Click that box on, and the next time you launch Photoshop, the images will appear at 100% normal instead of the Retina half size.
RESET DIALOG
When you’re working in a dialog, sometimes you may mess up the settings so much that you’d prefer to start over again. You could click the Cancel button and try again, or you could click the hidden Reset button and carry on working with the initial settings when you first opened the dialog. Where is this hidden Reset button? If you hold down the Option (PC: Alt) key, the Cancel button will turn into a Reset button. Click it and you’re good to go.
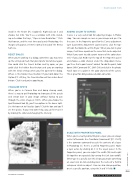
VISUALIZE SPOTS
When you’re in Camera Raw and doing cleanup work, there’s a way to get Photoshop to show you all the specks and sensor dust in your image without having to pan through the entire image at 100%. When you choose the Spot Removal tool (B), you’ll see options in the lower right. See the box next to Visualize Spots? Click the box and you’ll see the specks. If you need some help, you can fine-tune it by moving the slider and changing the intensity.
ADDING COLOR TO CURVES
Curves is a very useful tool for adjusting images in Photo- shop. You can sample an area in your image and pin it to the curve. In the Properties panel for the Curves adjustment layer (Layer>New Adjustment Layer>Curves), click the top- left icon that looks like a little finger. When you click in your image, it will leave a point on the curve that can be adjusted. What if you want to add a point to one of the color chan- nels? If you click RGB near the top of the Properties panel and choose a color channel under the drop-down menu, you’ll see that a point wasn’t added. To add the point, hold down Shift-Command (PC: Shift-Ctrl) and click in the photo. You’ll now see a point in the color channels of the curves. This is great for doing advanced color correction.
SCALE WITH PROPERTIES PANEL
When you’re creating something on a layer, you can always resize it afterwards. Free Transform (Command-T [PC: Ctrl-T]) is the common command to scale the contents of a layer. In Photoshop CC there’s a unified Properties panel. Make a layer active by clicking on it in the Layers panel. In the Properties panel, you can adjust the width (W) and height (H) together or separately (by turning the Link icon on/off). Either type in a specific size (this is how you make something an exact size) or click-and-drag over the name of a field to enlarge or shrink an object. You can also change position, or set a specific position, using the X and Y fields. ■
› › PHOTOSHOP TIPS
ALL IMAGES BY COLIN SMITH
CLICK TO RATE
093
› › kelbyone.com
