
Page 57 - Photoshop User January 2017
P. 57
Step Five: Start edging the slider back to the right until you begin getting black pixels. You may have to keep going a bit to make a large enough region near the intersection of the guides. This black spot should represent a good sampling point for using a Curves adjustment layer. If you need to, use the Move tool (V) to adjust the guides you set. The reason for adding the guides first is to ensure that you’re close to an actual gray area, rather than a region that’s simply neutrally toned, but has its own distinct color.
Step Six: Finally, add a Curves adjustment layer (Layer>New Adjustment Layer>Curves) at the top of your stack and click on the gray Eyedropper in the Properties panel. Turn off the Threshold and 50% gray layers by clicking on their Eye icons in the Layers panel, then click on the intersection between your two guides with the eyedropper. This will automatically adjust the color curves so that the sampled area becomes a true 50% gray. You can refine from there, though I recommend a second Curves adjustment for general contrast enhancement and other control.
CLASSIC POSTERIZATION EFFECT
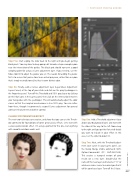
The next two techniques are creative, and show that you can use the Thresh- old command for foundations of some great classic effects. Let’s start with a classic posterization effect. I’m using a portrait for this one, but anything with smooth variations works well.
Step One: Add a Threshold adjustment layer above your Background layer, and start with the slider all the way to the left. Now creep to the right until you get the first set of details you want to include in your effect. In this case, I set the slider to about 33.
Step Two: Next, with the Threshold adjust- ment layer active in your Layers panel, use the Stamp Merge Visible command: Shift- Option-Command-E (PC: Shift-Alt-Ctrl-E). This creates a stamped version of your results on a new layer. Double-click the name of this new layer and rename it “0” or whatever makes sense to remind you that it will be your base layer. Turn off the 0 layer.
› › PHOTOSHOP PROVING GROUND
057
› › kelbyone.com
©Adobe Stock/gromovataya
