Page 93 - Photoshop User February 2017
P. 93
The adjustments will now work like smart filters, only they’re adjustments, so the effect is the same as clipped adjustment layers, but they don’t get separated from their layers, nor affect layers they shouldn’t. Whenever you need to make a change to one of the adjustments, simply double-click its name in the Layers panel.
DOUBLE YOUR CAMERA RAW ADJUSTMENT POWER
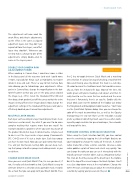
When working in Camera Raw, I sometimes move a slider in the Basic panel all the way over (and wish I could move it more, especially for things such as Highlights), to recover details in skies and such. There’s a way to trick Camera Raw into allowing you to turbocharge your adjustments. When you’re in Camera Raw, change the magnification in the bot- tom-left corner so that you can see the gray canvas around the image (e.g., 25%). Select the Graduated Filter (M) and then drag a short gradient just off the canvas so that the entire image is being affected (see image above). Now change the adjustment settings in the Graduated Filter panel and you’ve effectively doubled your Camera Raw adjustments.
MULTIPLE LAYER MASKS
Each layer can have only one layer mask (or pixel mask; it can also have a vector mask). So, what if you want to do some complex masking that requires more than one mask? An example would be a gradient, where you want to cut part of the gradient blend, but keep it nondestructive. All you need to do is nest the layer inside a layer group (Command-G [PC: Ctrl-G]) even if it’s just a single layer. Each layer group can have its own mask. Now you can paint onto that mask. Yes, and just like Russian nesting dolls, you can keep nest- ing that group into other groups and adding masks as you need them.
CHANGE QUICK MASK COLOR
Have you ever used Quick Mask? If so, I’m sure you love it; if not, it’s really useful and worth a shot. Quick Mask is a way to alternate between a selection and a paintable mask. It works like a mask that you can apply with your Brush tool (B). Press
Discuss this Issue
the Q key to toggle between Quick Mask and a marching ants selection. It’s also a fast way of checking a mask for little holes and missing areas. By default, this mask is a red ruby- lith color to mimic the traditional mask that would be manu- ally cut, from the X-Acto knife days. Most of the time, this works great, until you’re masking a red subject, and then it’s really hard to see the areas that are masked and the areas that aren’t. Fortunately, there’s an easy fix. Double-click the Quick Mask icon near the bottom of the Toolbar just below the Foreground and Background color swatches. You’ll now see the Quick Mask Options dialog. Here you can change the color of the mask to something else, as well as the Opacity (transparency). It’s very rare that I use the red color; I usually prefer a yellow or something much easier to see when work- ing with people and skin. For green landscapes, the red works well most of the time.
PRESSURE CONTROL OVER QUICK SELECTION
When using the Quick Selection tool (W), you have control
over the sensitivity by tapping the Left or Right Brackets on
your keyboard to change the radius of the brush. A smaller
radius makes for a more sensitive selection, whereas a wide
radius gobbles up lots of tones and selects very quickly. You
can change the radius or you can use it interactively with the
help of a pressure-sensitive tablet, such as a Wacom or Surface
Pro. Click on the little preview of the brush tip in the Options
Bar at the top of the screen to open the Brush Options. You’ll
see a Size drop-down menu at the very bottom. Change this
to Pen Pressure, and now you can adjust the sensitivity of your selection by varying your pressure on the pen. n 093
› › PHOTOSHOP TIPS
ALL IMAGES BY COLIN SMITH
› › kelbyone.com


