
Page 61 - Photoshop User February 2017
P. 61
we described above. The important thing is the concept, because understanding those concepts sets you up to have great control over sharpening tools.
APPLYING THIS TO THE SHARPENING TOOLS
Okay, here’s where we start applying this to the controls you see in Photoshop. Generally, strength (or Amount) values increase the multiplier values you see in the kernel. That is, instead of –1, you might see –1.5, and 5 might be replaced with 6. The bigger the difference between the numbers, the more contrast in the result. The slider you fiddle with adjusts all of the numbers in the kernel at once so there’s no overall change in image brightness or color, only contrast along edges.
Tip: You can try some of this yourself using Photoshop’s Custom Filter. It’s under Filter>Other>Custom. Beware! It only takes integer values; you can’t include decimals as you can with the Radius and Amount sliders using Smart Sharpen.
The Radius slider is a little different. What’s changing there is how many pixels are included in the calculation. So the size of the kernel actually gets bigger. This lets you consider even bigger boundary widths and create broader changes. Right away, it should make sense that larger Radius values contribute to smoother sharpening, but you risk generating halos; smaller Radius values can help bring out fine details. And if you’re really thinking ahead, you’ll see that multiple sharpening passes with small Radius and Amount values will have a different effect than trying to sharpen all at once with stronger values. [Note: For an in- depth look at using the sharpening tools available in Adobe Camera Raw and Photoshop, check out Martin Evening’s feature article starting on page 62.—ED] n
Discuss this Issue
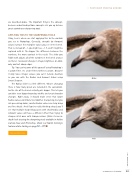
Before
› › PHOTOSHOP PROVING GROUND
After
ALL IMAGES BY SCOTT VALENTINE 061
› › kelbyone.com
