
Page 24 - Photoshop User February 2017
P. 24
HOW TO ››
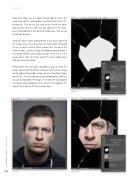
Step Five: Now use the Magic Wand tool to select the inside shape of the cracked glass, and then press Delete (PC: Backspace). Click on the Eye icon to the left of the Back- ground layer to turn it off, and you should see the trans- parent background in the deleted middle area. You can go ahead and deselect.
Step Six: We’re now ready to bring in the main subject of the image. Since this is based on the movie Split, I thought I’d use a subject with a rather serious face. So, open the subject image, and then drag-and-drop or copy-and-paste this image into the cracked-glass image. Once there, in the Layers panel, move this layer under the cracked glass layer with the deleted section.
Step Seven: Once the layer is positioned, you can move the image around and determine what part of this base image will be visible in the middle section. Use Free Transform (Com- mand-T [PC: Ctrl-T]), while pressing-and-holding the Shift key, to scale and position the image, if needed. We also rotated the image counterclockwise just a little bit to straighten the subject. Press Return (PC: Enter) when done.
Step Five
Step Six
Step Seven
024
› › photoshop user › february 2017
©Adobe Stock/sharplaninac
