
Page 23 - Photoshop User February 2017
P. 23
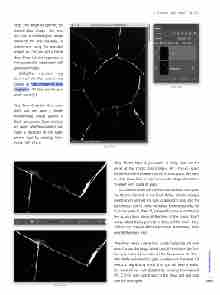
Step One
› › DOWN AND DIRTY TRICKS
Step One: Begin by opening the cracked-glass image. You may also use a cracked-glass image similar to this one; however, I’d recommend using the provided images so that you get a better idea of how the technique works, then proceed to experiment with your own images.
[KelbyOne members may download the files used in this tutorial at http://kelbyone.com/ magazine. All files are for per- sonal use only.]
Step Two: Once the file is open, you’ll see we have a simple cracked-glass image against a black background. Open the Lay- ers panel (Window>Layers) and make a duplicate of the Back- ground layer by pressing Com- mand-J (PC: Ctrl-J).
Step Two
Step Three
Step Three: Now if you zoom in really close on the detail of the cracks (Command-+ [PC: Ctrl-+]), you’ll notice that the lines aren’t joined in most spots. We need to close these lines so we can use the Magic Wand tool to select each shard of glass.
Choose the Brush tool (B) from the Toolbox, then go to the Options Bar and, in the Brush Picker, choose a simple round brush and set the Size to around 1 pixel and the Hardness to 100%. Now, with your Foreground color set to white (press D, then X), proceed to draw a continuous line as you trace along all the lines of the cracks. Don’t worry about being perfect; in fact, a little shaky hand adds to the cracked effect even more. Remember, trace over all the crack lines.
Step Four: Here’s a clever trick to see if selecting will work
now: Choose the Magic Wand tool (Shift-W) from the Tool-
box and, in the Options Bar, set the Tolerance to 15. Then,
click inside each shard of glass to select just that area. If it
selects a neighboring shard, then you still have a broken
line somewhere. Just deselect by pressing Command-D
(PC: Ctrl-D), then switch back to the Brush tool and trace
over the lines again. 023
› › kelbyone.com
©Adobe Stock/olegusk
