
Page 75 - Photoshop User December 2016
P. 75
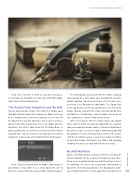
Keep these elements in mind as I describe my particu- lar technique to transform this quill and scroll from Adobe Stock into a stylized old painting.
The History Panel, Snapshots, and the AHB
Start by opening your image, then show the History panel (Window>History) so you have ready access. Notice at the top of the History panel is your first snapshot—it’s the state of the document as you first opened it, and it can be used as a source to any other regular layer. Press Y to choose your His- tory Brush, then Shift-Y again to get the Art History Brush. In your snapshot area, ensure there’s an icon next to the default snapshot layer. You can create a new snapshot at any time by clicking the Camera icon at the bottom of the History panel.
Note: If you’re starting from an Adobe Stock image in your library, it may come in as a smart object. Be sure to Rasterize it (Layer>Rasterize>Layer) before starting to paint.
The most obvious way to start with the AHB is simply to start painting on a layer above your background using the default snapshot. Go ahead and tinker with that for a min- ute to get a feel for how the tool works. The Options Bar at the top of your screen has controls for a very few blend modes, Opacity, Style of brush stroke, and controls for Area and Tolerance. And of course, you can choose a brush tip, or even a tool preset, which I’ll come back to later.
After a few passes with the various Styles, you should notice that the brush is picking up colors from the snapshot source and drawing random strokes. Clicking-and-holding in one place lets you see that the tool is continuously painting or stamping. The Area setting behaves a lot like the Scatter setting in the Brushes panel; it causes the stamps or strokes to spread out more. Meanwhile, the AHB is also sampling random pixels to use as solid color fills on each mark.
My AHB Workflow
Above, I mentioned limits, and one of them is that only the
default snapshot can be used on just about any layer. But I
like to create snapshots of adjusted and filtered layers. Here’s
the workflow I use to set up my painting: Starting from a document with only your photo in the Background, dupli-
cate it (Command-J [PC: Ctrl-J]), apply filters or adjustments 075
› › PHOTOSHOP PROVING GROUND
› › kelbyone.com
