
Page 73 - Photoshop User December 2016
P. 73
› › DYNAMIC RANGE
Step Five
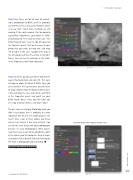
Step Five: There are lots of ways of convert- ing a photograph to B&W, and I’ve probably used them all. This is my current favorite, which is to say that I think more methods are still coming. It takes only seconds. Start by going to Layer>New Adjustment Layer>Black & White and clicking OK. Then click on what I call, “The Fickle Finger of Fate” near the top-left corner of the Properties panel. Click on the tones in your photo that you want to bring out, and drag left or right. In this case, I grabbed the gray in the left clouds and then the whites in the light- house. You can see the outcome in the sliders in the Properties panel from doing this.
Step Six: Next, go to Layer>New Adjustment Layer>Hue/Saturation and click OK. This layer will appear above the Black & White layer you just created in the Layers panel, but you want to drag it down below the Black & White layer. Click-and-drag the Hue slider back and forth in the Properties panel, and you’ll see your B&W image dance. Once you like what you see, stop making it dance, and you’re done.
The one camera setting or Photoshop slider you didn’t read about here is probably the most important one of all in the whole process: the heart! Since I was at these locales and knew where it all started, it was easy to finish. You can do the same thing with your photography because it’s your photography. What you’ve read here is just a start to the possibilities, both at the camera and the computer. Keep it simple and make it fun and you’ll find that finishing for the heart is photographically rewarding. ■
CLICK TO RATE
Click-and-hold on the image for a before view
Step Six
ALL IMAGES BY MOOSE PETERSON
073
› › kelbyone.com
