
Page 72 - Photoshop User December 2016
P. 72
HOW TO ››
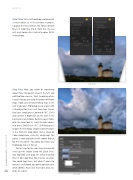
Step Three: Once in Photoshop (working with a smart object as in the previous example), I applied the Pro Contrast and Tonal Contrast filters in Color Efex Pro 4. With this, the sea mist and stormy skies started to come to life in our photo.
Step Three
Step Four
Step Four: Now you might be wondering about those transparent areas in the left- and right-bottom corners. Well, knowing where I wanted to go and using the power of Photo- shop, I took care of two finishing steps in the next single layer. Photoshop needs a layer with a thumbnail for these next two steps. To get that layer, simply press Command-J (PC: Ctrl-J) and rasterize it (Right-click on the layer in the Layers panel and choose Rasterize Layer). Now, grab the Lasso tool (L), select the right corner, and press Shift-Delete (PC: Shift-Backspace) to open the Fill dialog. Choose Content-Aware in the Contents drop-down menu, check on Color Adaptation, click OK, and bang! The corner is now populated with mood. Repeat for the left corner. You gotta love how easy Photoshop makes it for us!
The last step for this same layer is to quickly select just the clouds (using the Quick Selec- tion tool [W]) and apply the Detail Extractor filter in Nik Color Efex Pro 4 to the selection. You could stop there, but when it comes to romance and mood, you gotta go black-and- white (B&W). And since that takes only sec-
072 onds, let’s do it!
› › photoshop user › december 2016
