
Page 44 - Lightroom Magazine Issue 28
P. 44
› › lightroom magazine › ›
skin
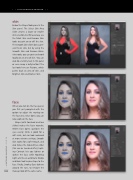
Below the Shape Tools panel is the Skin panel. The Select Skin Area slider creates a larger or smaller skin selection, but for accuracy, use the Mark Skin and Remove Skin tools to paint on or off the skin. The Smooth Skin slider does a gen- eral fix on skin, but by using the Smooth Skin and Remove Blem- ishes tools, you can go in and work locally on an area of skin. You can also do a tummy tuck in this panel or even swap a belly button! The last tools here are Restore, which paints back an area of skin, and Brighten Skin and Darken Skin.
face
When you click on the Face panel, you first get prompted with the option to adjust the markup on the face area. Once done, you can now work on the face.
Shape (with Forehead and Jaw sliders) makes the facer rounder; Widen Eyes opens up/closes the eyes evenly; Smile is good for a soft smile, but can look awkward at more extreme settings; Smooth Skin works for a soft retouch, and also moves the Around Eyes slider (this can be tweaked after); Light- ing Contrast lets you lighten or darken the face; while Modeling Light acts like an automatic Dodge and Burn tool to give shape to the face. Finally, Smokey Eyes darkens around the eyes, to emulate the
044 makeup look of the same name.
› › lightroom magazine › issue 28
