
Page 40 - Lightroom Magazine Issue 28
P. 40
› › lightroom magazine › ›
layout
The layout of PortraitPro Body is quite basic. There’s a main image preview area, where you mark up the body and preview your changes. On the right is a panel area, which contains panels that walk you through the process. There are slight differences in the panel settings depending on whether you choose Male or Female during the markup phase.
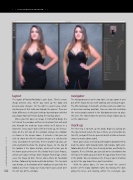
When you first open an image in PortraitPro Body, the left side of the window will have instructions that will walk you through the mark-up stage (which we’ll discuss in a moment). Once you’re done with the mark up, the instruc- tions on the left side of the window change to a toolbar as shown in the image above. It includes a tab you can click to show or hide the original image in a side-by-side view, and above the preview, there’s another tab you can click-and-hold to show the original image. At the top of the toolbar is the Home button, which will return you to the home page and recent files. Below that is Save Project, which saves your settings. Next is Export Final Image, which saves the image to disk. There’s also a Share on Facebook button, followed by Undo and Redo buttons. The tiny lock icon button, at the bottom of the toolbar, lets you hide the toolbar, but have it pop out if you hover your cursor over
040 the left side of the window.
navigator
The Navigator panel, on the top right, lets you zoom in and out of the image to ease with working and viewing images. The little landscape, full-length, and face icons are zoom lev- els based on markup positions. You can also click-and-drag the red rectangle around in the Navigator preview to place the view. The slider below the preview image allows you to set the zoom level.
mark up
The first step is to mark up the body. Begin by clicking on the nose to mark where the face is (there are instructions on the left), and you’ll then be presented with a Male or Female choice to make (above right).
Next, you’ll click a series of specified points (bottom left) to mark the joints: right shoulder joint, right elbow, right wrist, followed by the left side, then the belly button, and finally the leg joints. If it’s a 3/4 shot, you can click on the checkboxes for the legs in the Mark Up panel to let the app know they’re not in the photo. You can also press the H key as you’re marking up to let the app know these joints are hidden.
With the joints done, it’s time to mark the current outline of the body (bottom right). By moving the dots along the lines, and moving within the rectangle, you
› › lightroom magazine › issue 28
