
Page 11 - Lightroom Magazine Issue 26
P. 11
› › lightroom magazine › ›
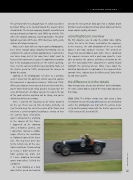
The car featured here is a Bugatti Type 11, which was driven by Simon Diffey, as he headed toward the Lavant Corner Grandstands. The French company, Bugatti, manufactured racing and road cars from the early 1900s up until the ’50s when the original company ceased operations. This pho- tograph was taken of the pre-1950 road race, with a wide mixture of vintage racing cars.
Now, I can’t claim to be an expert sports photographer, but I knew enough about shooting fast-moving cars to customize the camera settings appropriately. I wanted the cars to be sharp, but at the same time I didn’t want to freeze all the movement, because it’s good to have motion blur in the background and to see the wheels spinning. Here, I set the camera to Shutter speed priority mode, set the shutter speed to 1/250, and panned the camera to follow the action.
Looking at the photographs I’d taken at a previous event, I knew that the optimum shutter speed to capture this movement is somewhere between 1/160 and 1/320. When you shoot at shutter speeds that are faster than this, you’re more likely to get sharp pictures, but you lose the sense of movement. At slower speeds, it’s really in the lap of the gods whether anything will be sharp, and you’re definitely into fine-art territory.
Here, I wanted the focusing to be firmly targeted on the car. There was no time to frame perfectly, so I just tried to keep the car in the center of the frame and relied on a center-weighted auto-focus setting so that the camera focus mechanism
wasn’t distracted by anything
in the corners of the frame.
I happened to be shooting
with a mirrorless camera, and
I sometimes noticed a strobo-
scopic effect in the viewfinder
as I followed some of the faster
cars. This may have been due
to the refresh rate of the elec-
tronic viewfinder. Disconcerting
as it was, it didn’t prevent me
from getting my shots, but
if I were shooting fast-action
sports more often, I’d find this
a problem.
As I was shooting at a fairly slow shutter speed and wanted
to keep the lens aperture fairly open for a shallow depth of field, I selected a low ISO setting, which also meant better image capture quality, of course.
a brief lightroom overview
My first objective was to crop the photo more tightly, center the car in the frame, and lighten the exposure. In this instance, the dark bodywork of the car needed about a one-stop exposure increase. This created an image that overall looked quite light. Once I combined the exposure increase with a post-crop vignette, I was able to darken the corners and focus attention on the car. The two Radial Filter adjustments I added helped highlight the spinning wheels. What I love about the localized adjustments in Lightroom is the range of slider controls. Here, I adjusted just the Whites and Clarity sliders to add more sparkle.
the difference is in the details
Now that you have a basic idea of what I did in Lightroom, let’s take a closer look at each of the steps I took to process this image.
step one: The before version was shot using a Sony 70–200mm lens on the Sony a7r II camera. As I mentioned earlier, the photograph was shot with the camera meter set to Shutter priority mode with the shutter speed set to 1/250 using an ISO speed of 200.
011
› › kelbyone.com
