
Page 87 - Photoshop User March 2017
P. 87
› › DESIGNING IN PHOTOSHOP
Step Three
Step Four
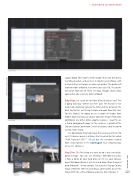
Layout dialog. We require a 3mm margin (this is our bleed area mentioned earlier), and we’ll set 4 Columns and 4 Rows, with a 2mm Gutter, just to give us some easy guides. The guides will show on both artboards, but when you click OK, the guides will vanish from one of them. It’s okay, though; they’ll show again when you select the other artboard.
Step Four: Let’s start on the front of our business card. This is going to be our “Where we met” part. The first one I ever made had a postcard style on the front and my details on the back. So, for this, we’ll keep it simple and work from that idea. For this tutorial, I’m going to use a couple of images from Adobe Stock, but you can source your own images from your portfolio or any other online graphic resource. I want to use a faded background image (in this instance, a photo of the Orange County Convention Center) and also a small vector to use for a fake stamp.
I’ve downloaded my two image files and saved them into my CC Libraries panel in a library that I created for this called “PSW Postcard 2017.” (Check out the awesome tutorial from Jesús Ramirez in the July/August issue showing how to use CC Libraries.)
Step Five: The first thing we want to do is place our back- ground image. You can use File>Place Embedded to place it from a folder on your hard drive, or if it’s in your Libraries panel (Window>Libraries), just click-and-drag it from the panel onto Artboard 1. (In my example, I’m using the Orange County image.) Hold the Shift key and drag a corner point to size the image to fill the entire artboard, and press Enter to place it.
[087]
Step Five
> KELBY ONE.COM
©Adobe Stock/Jesse Kunerth and Aquir
