
Page 60 - Photoshop User March 2017
P. 60
››HOWTO
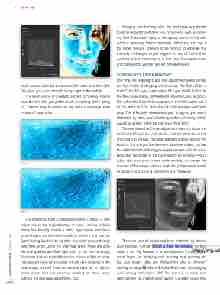
black control slider (at the bottom left) a bit in to the right. This gives you a nice smooth bump right in the middle.
The result is kind of inverted, but not completely. Notice how the skin tells you pretty much everything that’s going on. Texture may be easier to see with a midrange peak instead of solarization.
Before
After
The difference from a solarization curve is that it’s a little easier to keep the original picture in mind. Here’s a trick for doing fine healing: Create a blank layer above your Back ground layer, set the blend mode to Darken, and use the Spot Healing Brush (J) to go after tiny black dots and really dark hairs when using the Mid Peak layer. These are actu ally little sparkles and fine, light hairs on the normal image. Blemishes that are reddish/brownish or have a light or white halo around them are probably actually dark features in the base image, so heal those on another layer set to Lighten blend mode. You can continue working on these layers without the mid peak adjustment, too.
Dodging and burning with the mid peak adjustment tends to be better suited for fine corrections, such as remov ing dark lines under eyes, or reshaping bumps in the skin without removing them completely. While you can use it for larger features, it tends to be difficult to estimate the intensity of changes, so just toggle it on and off rather than working with it constantly on in that case. For overall shape and contouring, use the next set of helper layers.
LUMINOSITY AND NEGATIVE
This time, we’re going to add two adjustment layers to help see the results of dodging and burning. The first will be a Solid Color fill layer (Layer>New Fill Layer>Solid Color). In the New Layer dialog, set the blend Mode to Color, and click OK. When the Color Picker appears, in the HSB section, set S to 0% and B to 50%, and click OK to fill the layer with 50% gray. This effectively desaturates your image so you aren’t distracted by color; you’re looking at the luminosity, which would be a great name for that layer (hint, hint).
The next is another Curves adjustment layer just above the Solid Color fill layer, but with a twist. Grab the left anchor point and drag it to the top, then drag the right anchor point to the bottom. This acts just like the Invert adjustment layer, but has the added benefit of letting you adjust contrast with the curve. Now drag the middle of the curve slightly up or down—you’ll adjust this from time to time while working to change the contrast of the image, which is helpful to judge overall results of dodging and burning. Name this one “Negative.”
There are tons of dodge and burn methods, so choose your favorite. I wrote about a few techniques, so give those a try. My favorite is to use separate Curves adjust ment layers for dodging and burning and painting on the layer masks. [Also see “Retouching Men vs. Women” starting on page 62 where Brittany Smith uses this dodging and burning technique.—Ed] The point is to work non destructively on independent layers. Consider using two
[060]
> PHOTOSHOP USER > MARCH 2017
