
Page 59 - Photoshop User March 2017
P. 59
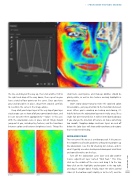
the line, and drag all the way up, then click another 1/4 to the right and drag all the way down, then repeat so you have a total of four points on the curve. Once you have your anchor points in place, drag them around carefully to resemble the curve in the image above.
Keep all of your helper layers at the very top of your layer stack so you can see how all of your corrections behave, and be sure to name them appropriately—“Solar,” in this case. With the solarization curve in place, lots of things should jump out at you, including tiny features, and the transitions between colors and between brightness levels. Things like
small hairs, weird pores, and makeup oddities should be plainly visible, as well as skin textures and oily highlights in some places.
Don’t worry about trying to relate the solarized colors to real colors—just pay attention to the transitions between areas. When you’re working on healing and cloning, it’s helpful to leave the solarization layer on in tricky areas, like a single hair over textured skin. It will be immediately obvious if you change the direction of texture, or make something too smooth. Toggling dodge and burn layers on and off below the Solar layer will show odd transitions and regions that need better blending.
MIDRANGE PEAK
The next curve I like to use is a midrange peak. It lets you see the smoothness of wider gradients without being broken up like solarization. I use this for checking skin texture, and it’s what I typically use when healing and cloning out small hairs and some blemishes on the face.
Turn off the solarization curve layer and add another Curves adjustment layer named “Mid Peak.” This time, click on the middle of the curve and drag it to the top. Now click on the highlights anchor point in the top right and drag it straight down. Finally, move the white control slider (at the bottom right) slightly in to the left, and the
› › PHOTOSHOP PROVING GROUND
Before
After
[059]
> KELBY ONE.COM
