
Page 67 - Photoshop User January 2017
P. 67
My iPad allows me much more room to move around, so I’ll do most of my corrections here. Anything I do on my iPad will be synced to the desktop so I can pick up and use more powerful features there, such as creating output formats for books, or managing my keywords. I also find it much easier to rank and flag images on the iPad using simple up and down swipe gestures.
But what if I want to add some text or a social media banner? Easy! Once I’m done with my corrections, I can tap the Share box in the upper right, choose Share, and then select Import with Creative Cloud. (Note: You’ll need to have the Creative Cloud app installed on your device to see this option.) There are some options to send to other applica- tions using Open In, but not all of them are immediately available. The Creative Cloud app will launch where you can pick a folder to which to upload the file, or you can create a new folder. Using Creative Cloud, I can get to my files from any of the mobile apps.
I’m done in Lightroom Mobile for now, so it’s time to open Adobe Comp CC. Comp is a layout application that’s meant for building quick mockups of collateral for print, screen, and Web. It has lots of preset project sizes, and I want to create a Facebook cover photo. Once the project is
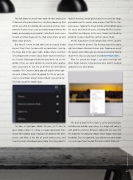
loaded, drawing a simple gesture onscreen creates an image placeholder (on the canvas, draw a large X that fills the tem- plate space). Tapping the image button at the bottom gives me access to all kinds of assets, including My Files (Creative Cloud Files) and Libraries. In this case, I know I just saved my photo to Creative Cloud Files, so that’s where I’ll go.
Pro Tip: If you haven’t used Comp before, there’s a built-in cheat sheet for the gestures. Tap the gear icon in the upper right and choose Drawing Gesture Help. Tapping on any of the gesture icons shows you an animated version of how to draw them. You can also watch my Adobe HelpX video.
After I’ve placed my image, I can add a text box and other design features. A few gestures later, and I’m ready to upload my new cover photo.
The Share button lets me choose a variety of destinations, including my desktop apps where the design will come in with all of the elements on layers, along with text styles. For the moment, I’m going to choose Share Image, then click Facebook. Once it’s uploaded, I can add my new cover image (see next page) from the post that was created. Schweet!
067
› › kelbyone.com
