
Page 66 - Photoshop User December 2016
P. 66
HOW TO ››
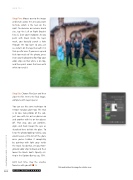
Step Five: Mouse over to the image and brush across the area you want to hide, which is the teen on the right. To decrease or increase brush size, tap the Left or Right Bracket keys ([, ]) on your keyboard. As you paint with black inside the layer mask, you basically punch a hole through the top layer so you can see what’s on the layer beneath it in that specific area. If you mess up and hide too much of the photo, press X on your keyboard to flip-flop your color chips so that white is on top, and then paint across that area with white to reveal it.
Step Six: Choose File>Save and then close the file. Here’s the final image, complete with Layers panel.
You can use this same technique to remove eyeglass glare too. The trick is to take two photos of the sub- ject: one with his or her glasses on and another with his or her glasses off. That way, you can combine, align, and mask (swap) the eyes as described here to hide the glare. To keep the photo looking realistic, you could reveal a little bit of the glare once you’ve hidden it completely by painting with light gray inside the mask. To do that, set your Fore- ground color chip to black and then lower the Brush tool’s Opacity set- ting in the Options Bar to, say, 30%.
Until next time, may the creative force be with you all! ■
Click-and-hold on the image for a before view
066
CLICK TO RATE
› › photoshop user › december 2016
