
Page 65 - Photoshop User December 2016
P. 65
› › BEGINNERS' WORKSHOP
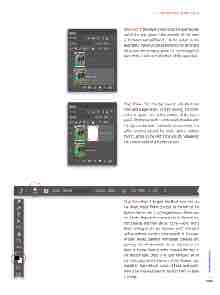
Step Two: In the Layers panel, drag the layer thumb- nail of the main photo—the one with all the teens in the frame named Prom 1—to the bottom of the layer stack. When you’re performing this technique using your own imagery, place the main image (the best of the bunch) at the bottom of the layer stack.
Step Three: Click the top layer to activate it and then add a layer mask to it by clicking the circle- within-a-square icon at the bottom of the Layers panel. Photoshop adds a white mask thumbnail to the right of the layer thumbnail (circled here). The white brackets around the mask corners indicate that it’s active so the next thing you do happens to the mask instead of the layer content.
Step Four: Press B to grab the Brush tool and use the Brush Preset Picker (circled) at the left of the Options Bar to pick a soft-edged brush. Make sure the Mode drop-down menu is set to Normal and that Opacity and Flow are at 100%—don’t worry about setting brush size because you’ll change it with a keyboard shortcut momentarily. In the realm of layer masks, painting with black conceals and painting with white reveals. So to hide one of the teens in the top layer in order to reveal the one on the bottom layer, press D on your keyboard to set the color chips at the bottom of the Toolbar (also circled) to their default values of black and white. Press X on your keyboard to flip-flop them so black is on top.
065
› › kelbyone.com
